

One of the things that has always irritated me when it comes to working with audio (of any flavor) is how when you ask someone or go looking for information about a specific subject, all you seem to find are vague responses about the theory behind this or that. Never anything really concrete or substantial. It truly is annoying as hell. And so help me, if I get told one more time that "you need to find a professional to do it for you", I am going to hurt someone.
This is how I felt when I was researching the ins and outs of audio book production. It's infuriating to say the least, but as a person who has worked with audio, off and on, since the mid 90's I knew that audio books were a different type of beast from what I was used to. Audio books are a lot more intimate than the standard songs you hear on the radio. There are no drums or guitars playing behind the vocalist that cover up minor vocal fluctuations, or a less than perfect noise floor. With audio books, it's just the narrator and the listener. So any misstep in the production process can be detrimental to creating that intimate moment.
When I was finally fed up with all the vagary, I went back to what I knew. When it comes down to it, audio is audio regardless of the format or genre. I listened to a few audio books to get a sense of what others were doing acoustically, and I went for it.
This resulting very long guide is "my work flow" on how I created the audio book for "A Walk Beyond The Realm". An audio book that passed the ACX quality control checks without a hick-up.
Am I saying that "this guide is the correct way of doing things"? No.
In fact, there will probably be many people who will disagree with the way I do things, or the equipment I use, or any number of a million different points they will want to nit-pick over. But frankly, I don't care. The proof is in the pudding on this one, and I like pistachio.
So without further ado...
First I'll give a quick rundown of the gear and software I used.
Gear:
Behringer B-2 Pro
At this point I like to apply the high and low pass filters again to clean up any stray frequencies we may have created while adjusting things around.


These don't make much of an audible difference so there's no point in trying to give examples.
Next I apply a De-esser called "Spitfish" from the effects menu.

This plugin does exactly what it says. It helps lessen the sharp "ESSSS" sounds from the recording. It can be a bit persnickety to dial it into your vocals, but the plugin even helps you do that. The image above shows how I have it setup for my vocals. On the top left hand side is a button called "listen", if you click that button and then click the green play arrow at the bottom the audio starts playing, but you will only hear what the plugin is removing. Depending on your voice type the "ESSSS" sounds can range from 4k to 8k typically. And since that is the case the "tune" knob is the only control we really need to worry about. As the audio is playing slowly (and I mean slowly) turn the knob and listen to the audio. When all you hear are piercing "ESSSS" and even "T" sounds then you know you have it dialed in properly. Click the "listen" button again and listen to how the plugin brings down the severity of the piercing "ESSS's" in the audio. If the sound is still too shrill then turn the "depth" knob clockwise some more. When you are satisfied, click where the green arrow button was again to stop playback, then click "Apply", and it will process the track.
Without De-ess:
Lexicon Alpha
With EQ:
Cheap In Ear Headphones
And my 2007 Acer Aspire 5050 laptop with 2GB of ram dual booting Windows XP and Debian.
Software:
Audacity
Reaplugs VST
The Fish FIllets VST's
W1Limiter VST
Acx-check.ny
And no I'm not kidding, this was all I used. Being a long time Linux guy, I have gotten used to not having to pay for software. As such, all the software I have listed here is either open source or freeware. In other words, "FREE". So don't ever let anyone tell you free software can't compete. In some instances it can (I'll step down off my soapbox now).
I also wanted to let you know now, that when recording I use a hardware compressor. Specifically the Behringer Composer Pro-XL MDX2600. I do not use software compression, mainly because I am an old school audio guy, but also because once the hardware is set I never have to mess with it again. As long as it is turned on, it is doing its job. So that is something to be aware of when reading further along in this "How to". If people are interested in the use of software compression I may add that in later. Just let me know.
Anyway, on with the show.
There are quite a few methods for recording long stretches of audio, like what you find in an audio book. My preferred method is to sit down in a nice comfortable chair and record a chapter from beginning to end, without stopping to fiddle with the recording. I place the text files on my phone and read them straight off of it.

But if you notice I never actually stopped recording. I just took a second and tried again. For me this saves a lot of time. True, the recording can end up being 2 or 3 times as long, but for me anyway, it doesn't pull me out of the moment. I'm not forced to change gears which could wreak havoc on the continuity of keeping a particularly difficult voice going. And the whole goal of this is to be consistent so it doesn't effect the listener.
Only after I have completed the entire chapter is it time for me to do the first bit of editing. Which involves starting from the beginning and removing the marked mistakes through out the entire recording.


As you can see above I select all of the marked mistakes from the beginning of the first bad take up until right before the beginning of the good take. As well as the label track below it. And then simply click "Delete" from the "Edit" menu. I select both tracks to delete so that not only does the audio get removed but the marks as well. This is so the marks stay aligned properly with the audio as they are removed.
I cannot stress enough the importance of listening to what you are about to delete, before you actually delete it. Just so you don't accidentally delete something you were not intending to, like the last good take. I've done it, it's no fun.


Just keep going all the way through the recording until you reach the end. It's very simple but can become very tedious. Then go back over it to make sure you didn't miss any. And again LISTEN BEFORE YOU DELETE.
Now we come to the first real complete listen-thru of the recording. This is to see if any retakes are necessary. USB audio interfaces are nice, like the Lexicon Alpha, but they are not perfect. Listen for missing or garbled words. The sounds of a chair squeaking while something is being said. Things of that nature that would require a retake.
I do retakes on separate track, and then copy the selected retake, and paste it over the bad one in the original. Now delete the retake track (and if it's still there the label track). Very simple, and you wind up with one primary "original" recording track. Which is much easier to work with.

Now that I have one track to contend with (it's so pretty) the real editing can take place.


I select the entire track and "Duplicate" it from the edit menu. This gives me an exact duplicate of my original track. This means I can leave my original recording untouched, no matter what I do to the duplicate. It gives me a backup in a sense, just in case.


Now I mute my original and collapse it, just so it's out of the way.


At this point I start giving my track different names to be able to tell them apart better. In this case I call my original recording "original" and my duplicate "work".


Now I select just my "work" track (make sure not to select both tracks) and click "Amplify" under the effects menu. The amplify effect will try to amplify the track to "0.0dB" this is what we want so don't change any settings, and just click "OK". After it has done its thing, you may notice the waveform is a little thicker. That's exactly what we want.


Now I go back to my effects and click "Low Pass". I set Rolloff at "48 dB" and Cuttoff freq for "16000.0" Click "OK" and let it do its thing. Then back to effects and click "High Pass". Set Rolloff at "48 dB" and Cuttoff freq for "80.0" Click "OK".
This is one of the requirements of ACX. These filters remove any sound above 16KHz and below 80Hz. These are sounds that can either be too high pitched or too low to make much of a difference in our final recording, so I start yanking them out here. I say "start" because I will do this again before I am finished with mastering.


Now back to effects, click "Click Removal". Threshold "200", Max Spike "20", click "OK". This one can be tricky, because if it is set too high it could remove things we don't want it to remove. On the flip side, if it's set too low then it won't remove what we want it to.
When in doubt, find a large "peak" in the recording that is an actual "click" or "pop" sound (listening is critical here), and test the settings. If it works to remove or lessen the sound to a tolerable level without making the audio sound strange (words missing letters and the like) then simply hit "Undo" and apply it to the entire recording. If not, then by all means play around with the settings until it does what it's supposed to.


And my 2007 Acer Aspire 5050 laptop with 2GB of ram dual booting Windows XP and Debian.
Software:
Audacity
Reaplugs VST
The Fish FIllets VST's
W1Limiter VST
Acx-check.ny
And no I'm not kidding, this was all I used. Being a long time Linux guy, I have gotten used to not having to pay for software. As such, all the software I have listed here is either open source or freeware. In other words, "FREE". So don't ever let anyone tell you free software can't compete. In some instances it can (I'll step down off my soapbox now).
I also wanted to let you know now, that when recording I use a hardware compressor. Specifically the Behringer Composer Pro-XL MDX2600. I do not use software compression, mainly because I am an old school audio guy, but also because once the hardware is set I never have to mess with it again. As long as it is turned on, it is doing its job. So that is something to be aware of when reading further along in this "How to". If people are interested in the use of software compression I may add that in later. Just let me know.
Anyway, on with the show.
There are quite a few methods for recording long stretches of audio, like what you find in an audio book. My preferred method is to sit down in a nice comfortable chair and record a chapter from beginning to end, without stopping to fiddle with the recording. I place the text files on my phone and read them straight off of it.
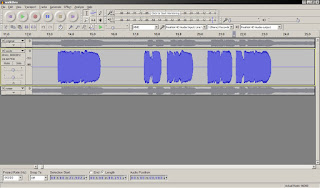
(If you use this method please make sure your phone is in "airplane mode" otherwise the close proximity can cause the mic to actually pickup signals from the phone)Next to me I keep my fingers on a keyboard that is attached to my laptop via a usb extension cable. I do this so I can control the recording program (Audacity) while my laptop is as far from the mic as I can get it. Because laptops are loud and I want to minimize background noise. But more importantly I use the keyboard to "Pause" the recording when I need to cough or compose myself for a different voice, as well as place markers in the recording using a feature of Audacity called "Add Label at Playback Position". I use the label's to mark when I know I've messed up. Because trust me you will mess up, and there is no point in jumping back over to your computer to remove a mess up while you're recording. I just mark it, and start the line over, like in the picture below. I messed up this line multiple times until I finally got a good one.

Click to Zoom
But if you notice I never actually stopped recording. I just took a second and tried again. For me this saves a lot of time. True, the recording can end up being 2 or 3 times as long, but for me anyway, it doesn't pull me out of the moment. I'm not forced to change gears which could wreak havoc on the continuity of keeping a particularly difficult voice going. And the whole goal of this is to be consistent so it doesn't effect the listener.
Only after I have completed the entire chapter is it time for me to do the first bit of editing. Which involves starting from the beginning and removing the marked mistakes through out the entire recording.

Click to Zoom

Click to Zoom

Click to Zoom
As you can see above I select all of the marked mistakes from the beginning of the first bad take up until right before the beginning of the good take. As well as the label track below it. And then simply click "Delete" from the "Edit" menu. I select both tracks to delete so that not only does the audio get removed but the marks as well. This is so the marks stay aligned properly with the audio as they are removed.
I cannot stress enough the importance of listening to what you are about to delete, before you actually delete it. Just so you don't accidentally delete something you were not intending to, like the last good take. I've done it, it's no fun.

Click to Zoom

Click to Zoom
Just keep going all the way through the recording until you reach the end. It's very simple but can become very tedious. Then go back over it to make sure you didn't miss any. And again LISTEN BEFORE YOU DELETE.
Now we come to the first real complete listen-thru of the recording. This is to see if any retakes are necessary. USB audio interfaces are nice, like the Lexicon Alpha, but they are not perfect. Listen for missing or garbled words. The sounds of a chair squeaking while something is being said. Things of that nature that would require a retake.
I do retakes on separate track, and then copy the selected retake, and paste it over the bad one in the original. Now delete the retake track (and if it's still there the label track). Very simple, and you wind up with one primary "original" recording track. Which is much easier to work with.

Click to Zoom
Now that I have one track to contend with (it's so pretty) the real editing can take place.

Click to Zoom

Click to Zoom

Click to Zoom
I select the entire track and "Duplicate" it from the edit menu. This gives me an exact duplicate of my original track. This means I can leave my original recording untouched, no matter what I do to the duplicate. It gives me a backup in a sense, just in case.
Click to Zoom

Click to Zoom
Now I mute my original and collapse it, just so it's out of the way.

Click to Zoom

Click to Zoom

Click to Zoom
At this point I start giving my track different names to be able to tell them apart better. In this case I call my original recording "original" and my duplicate "work".

Click to Zoom
Click to Zoom

Click to Zoom

Click to Zoom
Now I select just my "work" track (make sure not to select both tracks) and click "Amplify" under the effects menu. The amplify effect will try to amplify the track to "0.0dB" this is what we want so don't change any settings, and just click "OK". After it has done its thing, you may notice the waveform is a little thicker. That's exactly what we want.

Click to Zoom

Click to Zoom

Click to Zoom

Click to Zoom
Now I go back to my effects and click "Low Pass". I set Rolloff at "48 dB" and Cuttoff freq for "16000.0" Click "OK" and let it do its thing. Then back to effects and click "High Pass". Set Rolloff at "48 dB" and Cuttoff freq for "80.0" Click "OK".
This is one of the requirements of ACX. These filters remove any sound above 16KHz and below 80Hz. These are sounds that can either be too high pitched or too low to make much of a difference in our final recording, so I start yanking them out here. I say "start" because I will do this again before I am finished with mastering.

Click to Zoom

Click to Zoom
Now back to effects, click "Click Removal". Threshold "200", Max Spike "20", click "OK". This one can be tricky, because if it is set too high it could remove things we don't want it to remove. On the flip side, if it's set too low then it won't remove what we want it to.
When in doubt, find a large "peak" in the recording that is an actual "click" or "pop" sound (listening is critical here), and test the settings. If it works to remove or lessen the sound to a tolerable level without making the audio sound strange (words missing letters and the like) then simply hit "Undo" and apply it to the entire recording. If not, then by all means play around with the settings until it does what it's supposed to.

Click to Zoom
Click to Zoom


And after all that, we finally "Amplify" again. Just let it pick it's own numbers, because again it's just trying to amplify the recording to "0.0".

Click to Zoom
At this point my "work" track is as loud as I'm going to make it for the time being. I select the "work" track only, and Duplicate it. The duplicate gets renamed to noise, and I mute and collapse it for later.

Click to Zoom

Click to Zoom
This may seem strange, but it is for a step that is coming up. On my work track I try to locate a quiet part of the recording. A part that is just silence. No breathing or any other extra noises. Just the noise of the room. I select that section and click "Amplify". Now instead of hitting "OK" I just take note of the top most box of the amplify effect. This number (43.4 in this case) I either write down, or just try to remember it, and then click "Cancel". Be aware this number can and probably will change with every track. Now re-select the entire track again.

Click to Zoom
Under effects select "ReaGate" and set it up as shown in the image above. That big long slider on the far left of the image is where I use the 43.4 number I got from amplify. Except I want to set it 2 to 3dB higher than 43.4. As you can see I have it set to -41.8dB. What ReaGate is going to do is silence anything below the threshold of -41.8dB. While leaving everything above that threshold alone. If the threshold is set higher there becomes a greater risk of the plugin silencing parts of or even whole words and phrases.

After clicking "Apply" on ReaGate the audio will look something like the image above. Where before there was just room noise, now there is true silence. This silence becomes a goal of sorts later.

Now to help with the next step I will usually run "Truncate Silence" from the effects menu to help reduce the overall length of silence in the recording. I don't set it any shorter than 1.5 seconds for right now.


After running the ReaGate plugin I typically wind up with a bunch of these little sliver's of audio. Most of them are pops, ticks, and clicks that were below the threshold of the "Click Remover" plugin, but above the gate. So I manually go through removing them using the "Silence Audio" button. The difference between this and delete is that this does not remove the selection. It merely silences it. Again, listen before you silence.
Example Sounds: Here is a quick run through of just a few of the sounds I removed from this recording.
These sounds may be slight, but they can be very distracting when listening to an audio book.

And a few more examples.


The examples above show another kind of anomaly. These are a kind of mouth noise that are fairly easy to remove. If you zoom in within Audacity It can give you a possibly better view. Like below.


With that out of the way, I want to talk a moment about time. ACX requires that there be between 0.5 and 1 second of silence or room tone at the beginning of the file, and between 1 and 5 seconds at the end. Personally I like the sound of 1 second at the beginning and 1.5 seconds at the end. That way when multiple chapters are listened to there is 2.5 seconds between the two. The only trick here is to be consistent throughout all the chapters. Don't try and mix it up between chapters. Be consistent. So at the beginning of the file I run "Truncate SIlence" at 1.0 seconds, and since I already ran truncate with 1.5 seconds, the end is already taken care of.
As for everything else in-between, I run truncate at 0.75 because to my ears it's not too long between sentences and paragraphs to be annoying, but not too short to make it all run together.


Personally I would not leave everything at 0.75 as that separation by itself will become monotonous. As a way to break it up, I suggest grouping certain sentences or series of sentences with a 0.5 truncation. Such as sentences that would have a natural flow together when saying them aloud, or a single flow of thought. Differing thoughts, or where you would naturally pause when speaking should be left at 0.75.
A difference of 0.25 seconds may not seem like much at all, but it is a noticeable one in the long run. The whole point of this is to create a natural rhythm. Sometimes you may want to pause for dramatic effect. In this instance use up to a full second if you like, but I wouldn't go beyond that. Anymore and it feels unnatural breaking that rhythm we are trying to achieve.
Here is a before and after example of the work done so far.
Original Track:
Work Track:
And now we hit a touchy subject with a lot of "audio guys". Noise Removal. I am not going to get into the merits and drawbacks of either side. Frankly, I don't really care.
Personally I don't like room noise. I never have. So I lessen the amount of room noise until it is no longer noticed, and the silence created by the ReaGate feels natural. Which is why I said earlier that the silence is our goal.
To achieve this Audacity has a wonderful plugin called "Noise Removal".


Mute the "work" track and then expand as well as un-mute the "noise" track. Find a 2 to 3 second space of just room noise and select it like the top picture above. Now effects, and "Noise Removal". Click "Get Noise Profile" and the noise removal plugin will disappear.


Mute "noise" track, Duplicate "work" track, Rename duplicate to "NR" and un-mute it. Select around a 10 to 30 second clip of the "NR" track, click noise removal in effects. Enter the settings you see above, and click "Preview".
Noise removal is a not really something I can show in a picture, and it requires an incredible amount of listening focus to hear properly. I've included a before and after example as well as a couple of examples of what happens when there is too much noise removal below.
Before Noise Removal: Room noise can be heard while narrator is talking.
With "Proper" Noise Removal: Room noise is decreased to the point that the silences between words sound natural.
Too Much Noise Removal: Over processing causing artifacts. A sort of wobbly sound while speaking.
Extreme Noise Removal: Extreme over processing causing artifacts, and a sort of underwater effect while speaking.
If you have to adjust settings change them a little at a time, and hit "Preview" to listen to your changes. Once you are satisfied with the outcome click "OK".
My other suggestion is to not apply these settings to the entire recording in one shot. Instead select 30 to 60 seconds at a time, apply noise removal, and then listen to what you just did. If it doesn't sound right then simply click "undo" adjust settings, and re-apply. If that still doesn't fix the issue then use the "noise" track to find the part you're at in the recording, and repeat the "Get Noise Profile" on a room noise part from this section.
Why would you have to do this? Mainly because recording audio is not an exact science. Microphones pick up all kinds of things that you may not hear at the moment they are recorded. Such as how far away you are from the microphone at any given time. How much force you are speaking with. The background noise. Even temperature and barometric changes in the environment around you can affect how a recording sounds. There is a veritable cornucopia of possibilities for inconsistencies in a recording the longer that recording is. And audio book chapter can run from just a couple of minutes to an hour or more.
After noise reduction is completed for the entire track things start to get a bit simpler. Now Duplicate "NR", mute track, collapse, and rename duplicated track "effects". Just like before I create a duplicate to give me a point of reference to come back to should something go horribly wrong.
At this point, to see how the recording was coming, I exported my track as an Mp3 and played it in my car. The vocals, while sounding wonderful thru the headphones, had a muddiness and excessive bass to them in the car that would not work at all. Using a car stereo can be helpful when trying to make sure what you're working on sounds as good as it can on as many different devices as possible.

To remove the muddiness and excess bass I select the "effects" track and applied a custom tilt filter through the "Equalization" effect. The tilt filter starts as a -3dB cut at 80Hz that inclines upwards to a 1dB gain at 4000Hz. I did this to decrease the power and booming at the low end, as well as give a small nudge to the upper frequencies to help them stand out more. While not a huge change it is enough to lessen the mud in the car and bring out a brighter overall tone.
WIthout EQ:

Click to Zoom
After clicking "Apply" on ReaGate the audio will look something like the image above. Where before there was just room noise, now there is true silence. This silence becomes a goal of sorts later.
Now to help with the next step I will usually run "Truncate Silence" from the effects menu to help reduce the overall length of silence in the recording. I don't set it any shorter than 1.5 seconds for right now.

Click to Zoom
Click to Zoom

Click to Zoom
After running the ReaGate plugin I typically wind up with a bunch of these little sliver's of audio. Most of them are pops, ticks, and clicks that were below the threshold of the "Click Remover" plugin, but above the gate. So I manually go through removing them using the "Silence Audio" button. The difference between this and delete is that this does not remove the selection. It merely silences it. Again, listen before you silence.
Example Sounds: Here is a quick run through of just a few of the sounds I removed from this recording.
These sounds may be slight, but they can be very distracting when listening to an audio book.

Click to Zoom

Click to Zoom
And a few more examples.
Click to Zoom
Click to Zoom
Click to Zoom
Click to Zoom
The examples above show another kind of anomaly. These are a kind of mouth noise that are fairly easy to remove. If you zoom in within Audacity It can give you a possibly better view. Like below.

Click to Zoom

Click to Zoom
With that out of the way, I want to talk a moment about time. ACX requires that there be between 0.5 and 1 second of silence or room tone at the beginning of the file, and between 1 and 5 seconds at the end. Personally I like the sound of 1 second at the beginning and 1.5 seconds at the end. That way when multiple chapters are listened to there is 2.5 seconds between the two. The only trick here is to be consistent throughout all the chapters. Don't try and mix it up between chapters. Be consistent. So at the beginning of the file I run "Truncate SIlence" at 1.0 seconds, and since I already ran truncate with 1.5 seconds, the end is already taken care of.
As for everything else in-between, I run truncate at 0.75 because to my ears it's not too long between sentences and paragraphs to be annoying, but not too short to make it all run together.

Click to Zoom

Click to Zoom
Personally I would not leave everything at 0.75 as that separation by itself will become monotonous. As a way to break it up, I suggest grouping certain sentences or series of sentences with a 0.5 truncation. Such as sentences that would have a natural flow together when saying them aloud, or a single flow of thought. Differing thoughts, or where you would naturally pause when speaking should be left at 0.75.
A difference of 0.25 seconds may not seem like much at all, but it is a noticeable one in the long run. The whole point of this is to create a natural rhythm. Sometimes you may want to pause for dramatic effect. In this instance use up to a full second if you like, but I wouldn't go beyond that. Anymore and it feels unnatural breaking that rhythm we are trying to achieve.
Here is a before and after example of the work done so far.
Original Track:
Work Track:
And now we hit a touchy subject with a lot of "audio guys". Noise Removal. I am not going to get into the merits and drawbacks of either side. Frankly, I don't really care.
Personally I don't like room noise. I never have. So I lessen the amount of room noise until it is no longer noticed, and the silence created by the ReaGate feels natural. Which is why I said earlier that the silence is our goal.
To achieve this Audacity has a wonderful plugin called "Noise Removal".

Click to Zoom

Click to Zoom
Mute the "work" track and then expand as well as un-mute the "noise" track. Find a 2 to 3 second space of just room noise and select it like the top picture above. Now effects, and "Noise Removal". Click "Get Noise Profile" and the noise removal plugin will disappear.

Click to Zoom

Click to Zoom
Mute "noise" track, Duplicate "work" track, Rename duplicate to "NR" and un-mute it. Select around a 10 to 30 second clip of the "NR" track, click noise removal in effects. Enter the settings you see above, and click "Preview".
Noise removal is a not really something I can show in a picture, and it requires an incredible amount of listening focus to hear properly. I've included a before and after example as well as a couple of examples of what happens when there is too much noise removal below.
Listen to these with a set of in-ear headphones, with the sound turned up for best possible comprehension.
Before Noise Removal: Room noise can be heard while narrator is talking.
With "Proper" Noise Removal: Room noise is decreased to the point that the silences between words sound natural.
Too Much Noise Removal: Over processing causing artifacts. A sort of wobbly sound while speaking.
Extreme Noise Removal: Extreme over processing causing artifacts, and a sort of underwater effect while speaking.
If you have to adjust settings change them a little at a time, and hit "Preview" to listen to your changes. Once you are satisfied with the outcome click "OK".
My other suggestion is to not apply these settings to the entire recording in one shot. Instead select 30 to 60 seconds at a time, apply noise removal, and then listen to what you just did. If it doesn't sound right then simply click "undo" adjust settings, and re-apply. If that still doesn't fix the issue then use the "noise" track to find the part you're at in the recording, and repeat the "Get Noise Profile" on a room noise part from this section.
Why would you have to do this? Mainly because recording audio is not an exact science. Microphones pick up all kinds of things that you may not hear at the moment they are recorded. Such as how far away you are from the microphone at any given time. How much force you are speaking with. The background noise. Even temperature and barometric changes in the environment around you can affect how a recording sounds. There is a veritable cornucopia of possibilities for inconsistencies in a recording the longer that recording is. And audio book chapter can run from just a couple of minutes to an hour or more.
After noise reduction is completed for the entire track things start to get a bit simpler. Now Duplicate "NR", mute track, collapse, and rename duplicated track "effects". Just like before I create a duplicate to give me a point of reference to come back to should something go horribly wrong.
At this point, to see how the recording was coming, I exported my track as an Mp3 and played it in my car. The vocals, while sounding wonderful thru the headphones, had a muddiness and excessive bass to them in the car that would not work at all. Using a car stereo can be helpful when trying to make sure what you're working on sounds as good as it can on as many different devices as possible.

Click to Zoom
To remove the muddiness and excess bass I select the "effects" track and applied a custom tilt filter through the "Equalization" effect. The tilt filter starts as a -3dB cut at 80Hz that inclines upwards to a 1dB gain at 4000Hz. I did this to decrease the power and booming at the low end, as well as give a small nudge to the upper frequencies to help them stand out more. While not a huge change it is enough to lessen the mud in the car and bring out a brighter overall tone.
WIthout EQ:
With EQ:
At this point I like to apply the high and low pass filters again to clean up any stray frequencies we may have created while adjusting things around.

Click to Zoom

Click to Zoom
These don't make much of an audible difference so there's no point in trying to give examples.
Next I apply a De-esser called "Spitfish" from the effects menu.

Click to Zoom
This plugin does exactly what it says. It helps lessen the sharp "ESSSS" sounds from the recording. It can be a bit persnickety to dial it into your vocals, but the plugin even helps you do that. The image above shows how I have it setup for my vocals. On the top left hand side is a button called "listen", if you click that button and then click the green play arrow at the bottom the audio starts playing, but you will only hear what the plugin is removing. Depending on your voice type the "ESSSS" sounds can range from 4k to 8k typically. And since that is the case the "tune" knob is the only control we really need to worry about. As the audio is playing slowly (and I mean slowly) turn the knob and listen to the audio. When all you hear are piercing "ESSSS" and even "T" sounds then you know you have it dialed in properly. Click the "listen" button again and listen to how the plugin brings down the severity of the piercing "ESSS's" in the audio. If the sound is still too shrill then turn the "depth" knob clockwise some more. When you are satisfied, click where the green arrow button was again to stop playback, then click "Apply", and it will process the track.
Without De-ess:
With De-ess:
And now to deal with more of ACX's requirements. They require each audio file to measure between -23dB and -18dB RMS, have peak values no higher than -3dB, and a noise floor at a maximum of -60dB. If all of this sounds like incomprehensible tech talk, don't worry because it is. RMS is an averaging of the overall loudness of the recording. Peak's are the loudest points in a recording, and noise floor is the accumulated average of all the unwanted noise and signals within a recording.
And for those still shaking their heads at all the negative dB numbers. When dealing with audio 0dB is as loud as audio can go before it starts to do something called clipping. It's basically a boundary you don't want to go beyond or your audio will sound bad. -100dB is just about as quiet as something can get. It's all based on a logarithmic scale I'd rather not get into. So the smaller the negative number is, the louder it is. The bigger the negative number, the quieter. That's all you need to know.
Now I'm a guy that likes wiggle room within my audio. Unlike some audio guys I never try and push the limits of how loud I can make something. Because if you push too hard, you won't give yourself any room for mistakes. And mistakes WILL happen, no matter how good you are. This is the same reason why I make so many duplicates.
With this in mind I appreciate ACX's requirements. Their RMS measurment gives you 5dB to work in which is plenty in my opinion. Personally, within that range, I shoot for an RMS of -19.3dB because it is near the high end, but I still have wiggle room. And while they say peaks no higher than -3dB, I aim for -4.1dB. As for the noise floor, my recordings are typically below their required -60dB by a large margin mainly due to the gating and noise removal.

Click to Zoom

Click to Zoom

Click to Zoom

Click to Zoom

Click to Zoom
To deal with these numbers the first thing I do is Duplicate the "effects" track, and mute it. The new "effects" track I Resample down to 44100Hz from 96000Hz, and then I change the Sample Format from 24-bit PCM to 16-bit PCM. This translates the audio into another ACX requirement, but we are only using it temporarily.

Click to Zoom

Click to Zoom
Next I select the new "effects" track and go into the "Analyze" menu. I click on "Plot Spectrum". It gives an error basically saying the track is too long, just click "OK". From there the Frequency Analysis window pops up and gives me a pretty good over view of the audio. If you look around 80Hz you see that the audio drops off sharply, and that around 16000Hz it does the same. This means we have removed a lot of those frequencies out, just like we were intending. Now simply click "Close".

Click to Zoom
Also inside the "Analyze" menu is an option for "ACX-Check". Once it is selected it can take up to 3 or 4 minutes to run its calculations. After which you get this figure filled screen above. This screen lets you know where your recording sits in regards to ACX's requirements. As you can see it shows Peak level (-1.9 dB), RMS level (-21.1 dB), NoiseFloor (-96.5 dB), and down at the bottom a little announcement saying it "fails to meet ACX requirements" and why. At this point all we are really interested in is the RMS level (-21.1 dB). Write this number down so you don't forget it, and click "OK". The program will act like its frozen, but just be patient and let it finish up what it's doing and everything will be fine.
Now we take that RMS number and do some math with it (yes, really math)
21.1 - 19.3 = 1.8 (subtract the RMS level we want to be at, from the level we are actually at)
1.8 + 4.1 = 5.9 (add our new number with the peak value we want to reach)
And our new important number is 5.9
It is now time to remove our last Duplicated and altered "effects" track since we no longer need it.

Click to Zoom
Just clicking on the little "x" in the top left corner of the track will remove it. Leaving us with our original "effects" track that we can now un-mute like in the image above.

Click to Zoom
Next we select the entire "effects" track and select "W1Limiter" from the effects menu. On the right hand side we set our "Ceiling" to -4.1, and in the middle we set our "Release" to 1000ms. At the top we use our new special number and enter it in as a negative into the "Threshold". Now we just click "Apply" and let it work. (If you type in the number into their fields after clicking on them, make sure and hit your "Enter" key so they get saved properly. If you don't the settings will revert back to their defaults)
What the W1Limiter is doing is adjusting the amplitude of the audio to our desired settings. It's cutting the peaks off at -4.1dB and bringing up the rest of the audio to an over all average of -19.3dB. Which are our target values. And don't ask me how I figured out the math trick thing, because I honestly don't remember. I'm just glad I did figured it out, otherwise it becomes a case of trial and error. And nobody wants that.

Click to Zoom
Now we need to Duplicate our newly Limited and adjusted "effects" track just like we did last time and Mute it. Rename the duplicate to "Mp3 Master", Resample down to 44100Hz, set Sample Format to 16-bit PCM, select the whole track, and run "ACX-Check" again.

Click to Zoom
Now when we look at the check window it shows Peak level (-4.0 dB), RMS level (-19.3 dB), NoiseFloor (-96.5 dB), and a message that says "Clip meets ACX requirements". Which is a very pretty sight considering everything we've done. If the numbers are off by 0.2dB or even 0.3dB don't worry, that's why we put in the extra wiggle room.
Now if they are not even close to our target numbers then something went horribly wrong. You can use "Undo" from the edit menu to get you back to before you used the W1Limiter. When ever you select the edit menu "Undo" shows you which operation it is about to undo. Read it carefully each time you use it until it reads "W1Limiter". Undo that last one and you can start over from here.
Here is the difference the W1Limiter makes to the recording.
Without Limiter:
With Limiter:
Now we can export our finished product as an Mp3, which can be uploaded to ACX.

Click to Zoom

Click to Zoom
With the "Mp3 Master" track selected we click on the "File" menu and select "Export Selected Audio". This will bring up a save window. Type in the name you want to save it under and select where. Now click "Options" in the bottom right hand corner.

Click to Zoom
Set "Bit Rate Mode" to "Constant", and "Quality" to "192 kbps". These are again ACX requirements. "Channel Mode" needs to be set to "Stereo" regardless of if the audio is mono or not. Do not use "Joint Stereo" ACX will reject it. Click "OK"

Click to Zoom
Now click "Save"

Click to Zoom
Don't worry about anything here, just click "OK"

Click to Zoom
If this window pops up select 44100 and click "OK". It will build the Mp3 and save it.

Click to Zoom
And if you haven't done so until now go ahead and make sure you save the project. On top of that, slap your own hand for forgetting about until now like I did.
Now give yourself a bow, as this was no small feat.
The reality is, that editing and mastering isn't really that difficult as long as you know what to do. The biggest cost in doing it yourself is mainly time. And of course there is the grin inducing satisfaction of being able to say, "I did that, all on my own".
If you enjoyed this "How to" and would like to show your appreciation, you can do so by buying one or all of my books, in any of their varied formats. On the right hand side near the top of this page are links to them.
Thank you for reading, and I hope your audio books come out soon as well.
Steven Goldsborough
If anyone is interested in learning about the audio rig I used to record my audio book, just use the contact me page and let me know. I might make another how to showing how to set it all up.
All Software, Websites, and Hardware are Copyright by their respective owners.
No comments:
Post a Comment